Ruber IDE
A Ruby IDE written in Ruby
User manual – Plugins
Availlable plugins
Here’s a list of the plugins included with current version of Ruber1
- auto end
- autosave
- command
- find in files
- IRB
- project browser
- rake
- RI
- rspec
- ruby development
- ruby syntax checker
- state
- syntax checker
- YAML syntax checker
Auto end
The auto end plugin automatically inserts an end keyword when you type a newline
(pressing Enter) after a line which contains a keyword starting a construct which
requires a matching end. The recognized keywords are:
moduleclassdefifdobegincasefor
It also adds an =end after a line starting a block comment (=begin).
Finding out whether an end keyword needs to be inserted after a given line is not
an easy task. This plugin approaches the problem in the following way:
- check if the current line could require an
endkeyword. This is done by checking whether it contains any of the keywords listed above, using some simple regexps - if the line matches one of the regexps mentioned above, perform a syntax check
using the Syntax Checker plugin. If the check reports a missing
endkeyword error, then anendkeyword is added. Unfortunately, ruby error messages aren’t too reliable, so sometimes a spuriousendmight be inserted.
Autosave
The autosave plugin is used by other plugins to automatically save some files (which files depends on the plugin) before running certain actions, according to the settings chosen by the user (for example, the Ruby development plugin saves all project files before running the script associated with the project). As user, you don’t interact with the plugin, except to choose how it should behave.
In the Genral page of the Ruber configuration dialog there’s a section for the Autosave plugin. It contains a check box, which allows you to turn autosaving on or off for all plugin, and a checkable list of plugins under the Exceptions label. When autsaving is globally enabled, you can disable it for a plugin by unchecking the corresponding item from the list. Note that, if autosave is disabled globally, there’s no way to enable it only for some plugins. You need to enable it globally and manually disable it for the plugins you don’t want.
Command
The Command plugin allows you to directly interact with Ruber internals. It provides
a tool widget containing a text editor and an Execute button. Any ruby code written
in the text editor is executed in the Ruber environment (in the context of the
toplevel object) by using eval. All exceptions produced by your code are caught
and displayed in a message box, so Ruber won’t crash even if your code here is
incorrect.
The tool widget also contains a Show Output button, which toggles the visibility of another text widget (this one read-only). When you execute the code in the text editor, all output to standard output and stadard error will be displayed here instead.
Find in files
The Find in files plugin is a frontend for rak, which, according to the author, is a grep replacement in pure Ruby which accepts Ruby syntax regular expressions and automatically recurses directories.
To use this plugin, choose the Find and Replace in Files entry from the Edit menu.
This displays a dialog similar to the one in the following picture.
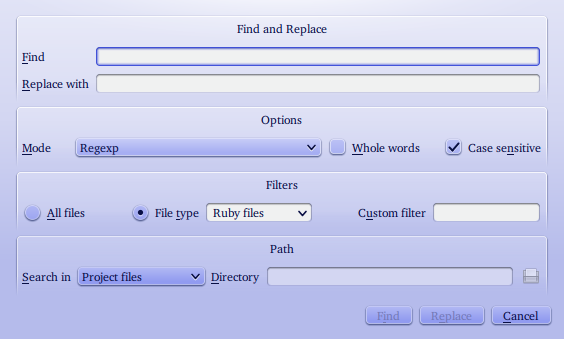
In the Find line edit, enter the text you want to find. It will be interpreted
as a regular expression or as plain text according to the value set in the Mode
combo box. If you want to replace the found occcurrences of the text with something
else, insert the replacement string in the Replace with line edit. You can use
back references here (\1, \2 and so on).
Under the Options caption, you find widgets to control how the search is performed: besides changing the mode as described above, you can decide whether the search should be case sensitive and whether only whole words should match.
The entries under the Filter label can be used to restrict the files to search. Checking the All Files radio button will cause the search to be carried out in all files; checking the File type button, and then one or more of the entries in the combo box next to it will cause the search to be performed only on files of the selected kind. Finally, the Custom filter line edit can be used to enter a regexp (not a shell glob) to add another filter in addition to the one provided by the file type.
Under the Path entry there are the widgets to choose the set of files to search. In the Search in combo box there are two or four entries (depending on whether or not you have an open project):
- open files
- the search will be done among all files corresponding to documents opened in the editor (editor tabs with documents not corresponding to open files will be ignored)
- custom directory
- choosing this entry will enable the Directory URL widget next to the combo box: the search will be done in all the files in the directory chosen here
- project files
- the search will be performed on all files belonging to the current project
- project directory
- the search will be performed on all files in the current project’s directory
Obviously the last two entries will only be present if there’s an open project.
The list of files to search is restricted according to the filters defined in the Filters section.
Once you filled the dialog according to your needs, press the Find or the Replace button depending on what you want to do (note that the Replace button becomes the default if the Replace with line edit contains some text).
Finding text
In response to the Find button, the dialog will be closed and the Find in Files tool widget becomes visible. It contains a tree with the names of the file wehere the text was found, having as children the list of matches. The numbers left to the matches are the corresponding line numbers.
Replacing text
If you clicked the Replace button, instead, the Replace in Files tool widget will be shown. It contains a tree somewhat similar to the one described above, with some important differences. Each match has two columns, labelled “Original text” and “Replacement text” as the names imply, the first contains the text found in the file; the second shows the text as it would be modified. To the left of each entry (both those with the file name and those with the match) there’s a check box. Unchecking the box will exclude that entry from the replacement. Note that unchecking a file entry will exclude all the matches in that file from replacement.
After having inspected the results produced by the match and chosen which replacements you actually want to carry out, you can press the Replace button in the tool widget to perform the changes. Note that, if the contents of a file change between the time it was searched and the time you click this button, the corresponding entries in the tool widget will become disabled, and you won’t be able to do the replacements in it.
If you decide that you don’t want to perform this replacement, you can use the Clear button in the tool widget to empty it. This isn’t actually needed, but it can avoid to press the Replace button by mistake.
If any files on which the replacement was carried is modified in the editor, the plugin will attempt to save it (using the autosave plugin). If you chose not to save them, they won’t be included in the replacement.
The plugin takes care of updating files open in the editor in which replacements have been performed.
IRB
As the name says, this plugin allows the user to run an IRB session from within a tool widget. Note that this is not a “Ruber console”, meaning it doesn’t allow you to interact with Ruber internals (the Command plugin does something like this): rather, it’s a separated process, just like the IRB you’d run in a separate terminal.
The plugin provides a tool widget, where you can input your code and see the output
from IRB. The main part of the tool widget is taken by the area where the output
is displayed. At the bottom, there’s a line where you can enter the next line to
send to IRB. Pressing the Return or the Enter button will send the current text
to IRB. After that, the widget will become disabled until IRB has finished evaluating
the code.
At the right of the line widget, there are two buttons:
- Restart IRB, which will stop the current IRB process and start a new one
- Interrupt Evaluation, which does the same as pressing
CTRL+Cdoes in a normal IRB session. You usually use this button to interrupt something which is requiring too much time. Due to the way this plugin works, some time may pass from the time you press the button to the time the evaluation is actually interrupted.
The plugin also provides a page in the configuration dialog. There you can choose:
- the path of the IRB program (which defaults to the path returned by which irb)
- the various prompts IRB should use. Configuring them is the same as configuring
the entries in the
IRB.conf[:PROMPTS]hash (for more on this, see the section “Configuring the prompt” of the chapter dedicated to IRB of Programming Ruby. The only difference is that you don’t have to add the ending%s\nto the:RETURNprompt: they’re automatically added by Ruber. The default prompts are those used by the:DEFAULTIRB prompt mode.
The IRB plugin uses the colors chosen in the color page of the configuration dialog to display input and output text. In particular, the input (the code you enter) is displayed using the message color, while the output IRB sends is displayed using the output color.
There are some differences between using IRB with this plugin and running IRB in a terminal. The most important are:
- you must not directly use IRB’s methods to change the prompt (that is, you
must not change
IRB.conf[:PROMPTS]or callIRB::Context#prompt_mode=). Use the Ruber configuration dialog as described above to change the prompt. - to avoid freezing Ruber in case IRB keeps sending output at a very high speed (for example, when in an endless loop which prints some output), output sent by IRB is only processed once every 0.1 second. This means that in certain situations, output can come slower (possibly much slower) than it would running IRB in a terminal. In most situation, this shouldn’t be noticeable.
Project browser
This plugin provides a tool widget which lists the files in the project directory in a tree. You can choose whether to display only the files belonging to the project or all the files in the directory by right-clicking in the tool widget and checking or unchecking the Show Only Project Files entry.
Left-clicking on a file will close the tool widget and display the file in the editor; doing so while pressing the Meta key will live the tool widget open.
If no project is open, will disable the tree view.
Rake
This plugin allows to run rake tasks for the current project from within Ruber. it requires that rake is installed to work (rake is included in the standard library in ruby 1.9).
The plugin provides the following functionality:
- Run rake task for the current project from a dialog or menu
- Associate shortcuts to rake task for current project
- Associate shortcuts to rake task globally (quick tasks)
In the Rake page in the Ruber configuration dialog, you can choose the rake
program to use and whether standard output from rake should be synchronized or
not (this is implemented passing -E '$stdout.sync=true' to rake). You can also
setup quick tasks there (see below).
In the Rake page in the project configuration dialog, you can set several options related to rake for the project itself:
- the options to give to ruby when running rake
- the rake program to use (override the option set globally)
- the rakefile to use for the project. If left empty, rake will be left free to find out the rakefile by itself (from the project directory)
- the environment variables to pass to rake. It must be a list of strings of the
form
VAR1=value1 VAR2=value2 VAR3="value 3" VAR4='value 4'. If you need space in values, you need to quote the value. Note that the parsing of such strings may fail in unusual cases - the maximum time allowed to rake to retrieve the list of tasks from a rakefile. In several circumstances, this plugin needs to find out from rake which tasks are defined in the rakefile. If the rakefile is improperly written this can freeze Ruber (for example, in case of an endless loop). To avoid this, the Rake plugin gives rake a maximum time to obtain the list of tasks. If you know that the rakefile for a given project needs more time than the default allowed to generate the list of tasks, you can increase the time
- whether standard output from rake should be synchronized or not. This overrides the global setting
- configure the tasks for the project (see below)
Run rake tasks for current project
To run tasks for the current project, you can use either the Ruby/Rake/Run Rake Task
or the Ruby/Rake/Project Tasks menu entries. The former will display a dialog
with a list of tasks defined in the rakefile associated with the project; the
second displays a submenu with the same tasks.
Since retrieving tasks from rake takes some time, this list is not update every time the menu or the dialog are displayed (in particular, the first time you display the dialog or the menu, the list may be empty). To update the list, you need to press the Refresh Tasks button in the dialog or choose the Refresh Tasks entry from the submenu.
To run a task from the dialog, select it from the list, then click the Ok button. You can use the line edit above the list to search for a task in the list.
To run a task from the submenu, simply choose the correspoding entry.
Note that you can’t run the default task from either the menu or the dialog. To
do so, use the Ruby/Rake/Run Default Task menu entry.
Associate shortcuts to tasks for project
You can associate a keyboard shortcut to tasks in the current project. To do so, open the project configuration dialog and go to the Rake page. Under the Tasks caption, you’ll find a list of tasks defined in the rakefile. As described above, the list of tasks may not be up-to-date. Use the Refresh task button below to update it. Double-clicking on the Shortcut column of the list will bring up a shortcut editor, where you can choose the shortcut for the corresponding task. You can also add or remove tasks manually by using the Add Tasks and Remove Tasks button.
Quick tasks
Quick tasks are task which you configure globally and are availlable for all projects.
They’re meant to be used for tasks you have in each project, so that you don’t have
to configure them each time (for example, almost of my projects have a doc task.
Defining a quick task with that name and assigning a shortcut to it, I can execute
the task with a single key press for any project).
You can execute quick tasks either by using the associated keyboard shortcut or
using the Ruby/Rake/Quick Tasks submenu.
You manage quick tasks from the Rake page of the Ruber configuration dialog. You can add tasks using the Add Task dialog and remove them using the Remove Task dialog. Double clicking on the task name or shortcut, you can edit them.
RI
The RI plugin provides a tool widget to search the RI documentation.
The tool widget contains a line edit where you can enter the string to look
for and a text area where the results are shown. To start searching, press the
Search button or simply press Return ro Enter in the line edit.
The plugin can search for a class or method name or for a method name in a specific
class (as usual, use Cls.method_name for a class method and Cls#method_name
for an instance method). If more than a possible entry is found (for example,
because a method is defined in different classes or provided by different libraries),
a list of all the results will be shown. Clicking on a link will display the
documentation in simple HTML format (the format is similar to the HTML produced
by RDoc, but without hyperlinks).
The RI library used by the plugin is the one associated with the current interpreter, as explained in the description of the Ruby development plugin.
RSpec
The RSpec plugin allows to run rspec examples from within Ruber, displaying the results in a tool widget. It will only work from within a project.
This plugin should work with both RSpec 1 and RSpec 2. It will use RSpec 2 if
`which rspec` returns finds something and RSpec 1 otherwise.
There are several options you should set from the RSpec page of the project configuration dialog before you can use this plugin. That page contains several settings:
- Ruby options
- the options to pass ruby when running RSpec. Depending on your
ruby and RSpec version, you may want to add
-I .there, to make sure the current directory is included in the load path. - RSpec
- here you can choose the path to the
rspecorspecprogram (the default is the path returned by `which rspec` or `which spec`, depending on which one doesn’t return an error. You can also choose the options to pass to RSpec and whether to include full backtraces (which is the same as passing the-boptions to RSpec). This option should be enabled if using RSpec 1, while it should remain disabled with RSpec 2. - Spec Files
- here you can choose the directories containing the example files, the directory containing the code files and a filter to distinguish spec files from other files (for example, helper files) in the spec directories. The filter is simply a shell pattern and should only take into account the name of the file, not the full path. The spec and code directories don’t need to include only specs and code files, respectively. For example, they can both be set to the project’s toplevel directory. What is important is that the spec directory contains all specs files and that the code directory contains all code files (of course, code and spec files can be in subdirectories).
- Patterns
- here you associated code files with the corresponding spec files.
By default, any file with extension
.rbis associated with a spec file having the same name with a_spec.rbappended to it. If you want to add a new pattern, use theAdd Patternbutton. It will insert a new entry in the list. Double click on it to change it. In theSpec filecolumn, you can use several special sequences:
%f: this is replaced with the name of the code file (without its path and the.rbextension)%d: this is replaced with the directory of the code file (relative to the project directory)%dn: here n can be any number. This is replaced by the _n_th part of the code file directory (relative to the project directory). For example, the special sequence%d2when applied to a file nameda/b/c/e/f/d.rbwill becomeb(note that path parts are counted from 1, not from 0).
The RSpec plugin adds a Tests submenu to the Ruby menu. It contains several entries:
- Switch to Spec/Switch to Code
- the name of this entry is different depending
on whether the current file is a code file (then the name will be
Switch to Specor a spec file (Switch to Code). In the first case, it will display one of the spec files associated with the current document; in the second case it will display the code file associated with the current document - Run Project Specs
- runs all the spec files associated with the current project, displaying the result in the tool widget
- Run Specs for Current File
- if the current file is a spec file, that file is run. If the current file is a code file, all spec files associated with it are run
- Run Current Spec
- if the current file is a spec file, RSpec is run on the line
where the cursor is (using the
-largument ofrspec/spec). If the current file is a code file, instead, the plugin looks for open spec files associated with the current file. If it finds them, it looks for the one which was activated last and looks RSpec on it, on the line where the cursor was. If no spec file is open, nothing is done
In the RSpec page of the Ruber configuration dialog you can change two behaviour of the plugin:
- you can decide whether the editor for the file opened by the
Switch to Specmenu entry will be opened in a new tab or by splitting the current editor (so that you can have the spec and code file side to side) - you can decide whether or not to expand the entries corresponding to failed examples in the tool widget. You can choose between to expand no entry, only the first one or all of them (the latter could be slow if there are many failed examples)
From the RSpec page of the project configuration dialog, you can change several
other parameters: the options to pass ruby when running rspec, the path of the
RSpec executable to use, options to be passed to RSpec and whether to instruct
RSpec to generate full backtraces (which is the same as passing the -b option
to RSpec).
Ruby Development
The Ruby Development plugin allows you to run the program associated to your project, the file corresponding to the current document or any other file from within Ruber and to display the output in a tool widget.
The Ruby/Run Current File menu entry will run the file associated to the current document
in ruby, while the Ruby/Run Current File will show a dialog where you can choose
the file to run.
The Ruby/Run menu entry will work as Run Current File if there’s no open project
and there’s an open ruby file and as Run File if there is neither an open project
nor an open file. If there’s an open project, instead, it will run the script
associated with the project. By default, it’s a file with the same name as the
project and located in the bin subdirectory of the project directory. You can
change it In the ruby page of the project configuration dialog by entering another
file name in the Path line edit.
This plugin also allows to run scripts in a terminal, rather than in Ruber. This
is mostly useful for scripts which read from standard input, as it (currently)
can’t be done from within Ruber. You can enable this by checking the
Ruby/Run Programs in Terminal menu entry or through the project or document
configuration dialog. The default application is Konsole, which is included in
KDE. If you want, however, you can configure the plugin to use a different terminal
emulator (see below for details).
There are several global settings for this plugin, which you can change in the Ruby page of the Ruber configuration dialog. They are:
- the list of availlable ruby interpreters. By default this plugin looks for programs
called
ruby,ruby19,ruby18,ruby1.9andruby1.8in your PATH (using thewhichprogram). To add other interpreters, remove the ones you don’t want to see listed or change the order, use the Availlable interpreters widget - the default ruby interpreter to use. Among the interpreters listed in the Availlable Interpreters widget, you can choose which one to use by default by setting it in the Default Interpreter widget
- the default options to pass to ruby. Set them in the Ruby options widget
- the terminal emulator program to use. Write the command line to use in the Terminal
line editor. There are two special placeholders recognized:
%d, which means the directory where the terminal emulator should be open into and%rwhich indicates where the ruby command line should be put. This placeholder must either be enclosed in spaces or be at the end of the line and preceded by a space. Note that command line arguments can’t contain spaces.
Some parameters used by this plugin can also be configured on a per project base from the Ruby page of the project configuration dialog. They are:
- the path of the project script (as described above)
- the options to pass to the project script
- the working directory of the project script (which defaults to the project directory)
- whether the project script should be run from a terminal or not
- the ruby interpreter to use (overrides the global setting)
- the options to pass to the ruby interpreter (overrides the global setting)
Most of the above options can also be set on a per document base (except, of course, for the project script and the working directory).
The ruby interpreter to use can also be changed temporarily by selecting another
interpreter from the Ruby/Ruby Interpreter menu. This overrides both the global
setting and the setting for the current document or project.
Ruby syntax checker
This plugin provides a syntax checker for ruby files to be used with the Syntax Checker plugin.
The syntax check is performed using ruby -c. The ruby interpreter is obtained
from the ruby development plugin.
State
The State plugin allows to save the state of Ruber, of each project and each document between sessions, so that it can be restored when Ruber, the project, or the file is next reopened.
By state, this plugin mean:
- for Ruber
- the list of open projects and editors not associated with any project
- for a project
- the list of editors associated with to the project
- for a file
- the cursor position in the file.
As a user, you don’t interact with this plugin, except to configure its behaviour in the Ruber configuration dialog. The options you can change are:
- when opening a document, whether to move the cursor to the position it was when the document was last closed
- what to do when Ruber starts up. You can decide to:
- Restore all the open projects and editors
- Restore all projects, but not editors not associated with any projects
- Restore editors not associated with any projects, but not open projects
- Keep the default workspace
When restoring sessions, editors associated with an unsaved files will become empty.
Syntax Checker
The sytnax checker plugin allows to check the syntax of a file, according to some kind of rule.
This plugin knows no syntax rules, so it can’t perform syntax checks by itself. It needs to have syntax checkers installed for each kind of file you want the check to be done. For example, Ruber comes with a syntax checker for ruby files and for YAML files. Each syntax checker has its own ways to check syntax and the quality of the error reports may be different from one checker to the next.
The syntax checker to use for each document is determined according to the file extension, which means that it will only work if the document has been saved to file (note that the file is only used to determine the checker to use: the contents will be those displayed in the editor, even if they haven’t been saved).
The syntax check is done every time the file is saved and after a pause of at least 1 second while editing the document (that is, if you don’t change the text for at least one second). You can disable this automatic checking from the Ruber configuration dialog in the Syntax page.
The result of the last syntax check is shown in a LED widget at the right end of the status bar: if it’s green, then there aren’t syntax errors; if it’s red, there are syntax errors. Finally, if it’s gray it means that no syntax check has been done, either because the document isn’t associated with a YAML or ruby file or because the conditions for the check haven’t already happened.
In case of syntax errors, hovering with the mouse over the LED will display a tool tip with the error message of the first error; left-clicking on the LED will move the cursor to the corresponding line. Right-clicking on the LED will display a menu listing all the errors: clicking on an item in the menu moves the cursor to the position of the corresponding error.
YAML syntax checker
This plugin provides a syntax checker for YAML files to be used with the Syntax Checker plugin.
The syntax check is performed using by loading the file using YAML.load and
seeing whether or not it raises exceptions. Unfortunately, it’s not possible to
report specific information on the kind of error, as YAML.load doesn’t provide
any.
1 Actually, there’s another plugin, called Ruby Runner which comes with Ruber. However, this plugin is mostly of support for other plugins. The settings it provides it described together with the Ruby development plugin.